Sunday, May 13, 2012

Copic Class samples using Loralie

I have been working on material to teach a new copic class. This intermediate class includes working with different skin and hair colors, as well as how to color an image "white." This was a great stamp to work with to showcase different skin and hair colors. I kept the suits consistent - working with the technique of coloring "white" -to better compare the impact of different skin and hair colors. The card base is SU crumb and marina mist, (individual cards use either peach parfait, pale plum, pumpkin, limeade); DP is from echo park (Splash) and from imaginensce. The wave border is from MFT. Pearls and crystals are from SU and colored with copics.
I tried two different looks for the hair; using a blended technique that requires that the surface stay wet (redhead)  and then one that shows strands of hair (brunette). Spica pens are used to color the eyelids for a bit of sparkle.


Thursday, May 10, 2012

Meeting the challenge with Loralie

For this week's challenge #71, I borrowed a Loralie stamp from Kitty called Beach Bum. I really enjoyed working with the copics on this Loralie lady and plan to do more. The hat became the challenge's circle accent - even it it is on the opposite side.
This is the card that almost wasn't. Last night, I was on the last step - stamping the inside verse, and accidentally brushed the front of the card across the black ink pad. I was so frustrated that I just had to walk away.This morning before work, I deconstructed the card, restamped the verse, trimmed away some of the black edges and relayered. Last night, I tried to wash off some of the ink from the floral background, but it wasn't happening. This morning I had the idea to cut out another flower and pop dot over the place brushed in black. I really like how it worked out. The pearls embellishments are colored with copics to match the rest of the card.


The DP was picked up this weekend at our local shop because I love the bright pink and sea blues. It is from imaginisce. The hat is paper pieced and shaded with copics. I stamped the crown a second time and pop dotted. I tiny twist of tulle was inserted under the bow. I used a MFT die for the inside along with a shell image from the stamp set and some more colored pearls. I included an index at the end of this post.


Thursday, May 3, 2012

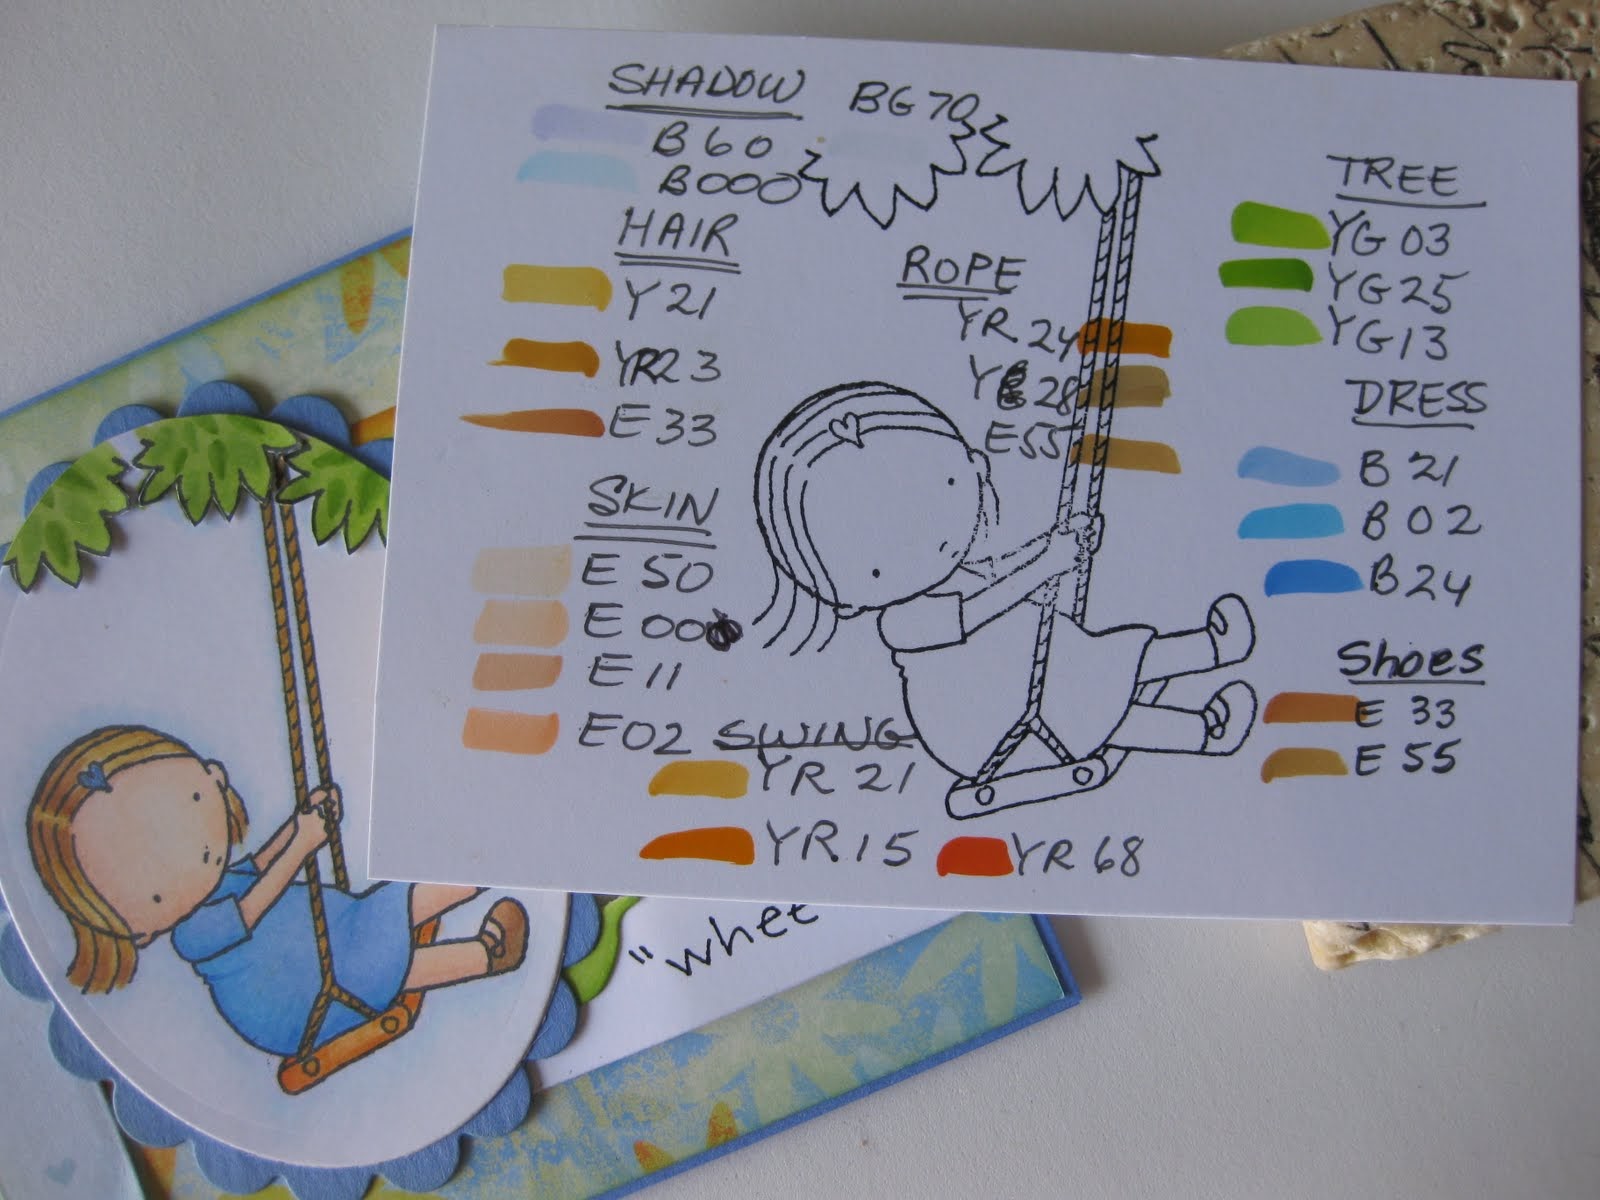
MFTWSC70 - Wheee!

 
This PI girl just makes me smile. She is stamped in tuxedo black on copic X-press it paper. I have included an index of the copic markers that I used at the end of this post.The colors were chosen to match the paper. I usually color the image and then try to find paper; this time I started with DP from my stash and then chose markers to match. The card base and scalloped background (nestablilty die) are retired SU cardstock: Ballet Blue. The thin edge of orange is actually white cardstock that has been inked with honey distress ink.


 I also added honey distress ink to the ribbon (by SU) and to the felt rolled rose (felt and die are both from MFT) because they were just too yellow.  Both the ribbon and the rose are spritzed with Perfect Pearl Misters in Sunflower for a bit of glitz that just doesn't show up well in photos.
The MFT flourish die is set behind the flower. I colored white CS with the same green markers used in the tree leaves because I didn't have the perfect green CS to use. I trimmed the stamp set's sentiment and just used part.It is stamped on white CS cut from the MFT fishtail die (as is the other one on the front and the three on the inside). The end of the fishtail is raised slightly with foam tape.
 I hope she makes you smile too.

Monday, April 30, 2012

Playing with Giraffe Girl

I had purchased this set as part of an early release package and then found the paper at a scrapbook store. The card base is SU saffron and layered with an embossed bashful blue and a layer of pear. The little cutie is mounted on saffron cut using the MFT vertical greetings die and then sponged with distress (I think it was honey, but to be honest, I just used what was already on my blending tool). Mounted on a mini doily from MFT, the rolled flower is another MFT die that has been spritzed with Perfect Pearl Misters in Sunflower. I love the sparkle of these mists. Check back later today to see an index of the copic marker colors that I used on xpress-it white as well as how I decide to finish the inside. I think I need to add some bling to her hair flower too.My daughter is coming by shortly and we are going to have a girls day - nails, lunch and a trip to JAX for a visit to some stamp and scrapbook stores.

Sunday, April 29, 2012

Butterfly's Twin

I had to make a big decision today: evaluate notebooks for school or play with the butterfly twin. As you can see - no contest. You can see the markers that I used for her in the index at the end of the post here.

Her extra set of wings is baja cardstock punched with a Martha Stewart punch and sponged with Inka Gold in Old Silver. She is foam mounted on a retired SU cardstock (almost amethyst) and cut with a MFT die that I picked up on my trip yesterday. I trimmed a piece of DP and layered the die. Both pieces are sponged with broken china distress ink.

A piece of ribbon from my stash wraps around the card front. Die cut scallops are cut from SU cardstock: celery, baja and amethyst. The MFT mini rolled rose and flower are cut from DP and the edges are sponged in Inka Gold. A crystal rests inside the center of the rose. Behind the flowers is the MFT flourish.


The card base is SU cardstock: baja. The inside of the card has scallops and the flower trio cut from DP and sponged with more Inka Gold and button centers.


Time to Play

I didn't know if I was going to be able to get a MFTWSC done this week. It's been crazy busy at school and I have a pile of notebooks still to evaluate - but - there's no school tomorrow! We don't know why we have a random holiday, but no one's complaining - especially me.

Last week, I chose some DP from Michaels and colored Butterfly Kisses to match, but decided the layout when the Wednesday Challenge came out. The card base is SU Celery and she is stamped with Memento's tuxedo black on copic X-press it white.

At the end of this post, I have included an index of the marker colors I used for her and her twin (who is not mounted yet). A small crystal adorns her hair clip. Anita said that she looked undressed, so I added an organdy skirt using 2 1/2" of organdy ribbon, gathered and sewn onto the card. The ribbon was 1" wide from SU that I folded in half lengthwise (because I didn't have 1/2" ribbon - hard to imagine that I didn't have the ribbon I wanted.)

The DP is mounted on SU cardstock: River Rock and and Taken with Teal (expired). Velveteen scalloped ribbon embellishes one side and the sentiment from the set is altered. The sentiment is mounted on a scallop circle die from nestabilities and I made some leaves from organdy ribbon and the larger of the rolled mini rose cut using a MFT die and felt. To make leaves from ribbon, cut a length of ribbon twice the width (in this case 2"). Fold both outside, top corners to the middle of the bottom forming a triangle and run a small gathering stitch across the base.

A resist canvas butterfly has been dyed with distress stains (broken china and shabby shutters) and rests on some flags of DP on the inside of the card.


Copic Class with Wendy

I had a wonderful day yesterday; I traveled over to My Favorite Things Boutique in Eustis. It was perfect weather for a trip - I put the top down and some tunes on and headed over to central Florida with a scenic drive through the National Forest. It didn't take me as long as I thought and it was very easy to find. Kim and her daughter are so warm and friendly and the shop is delightful. I really enjoyed all the beautiful samples and being able to see the dies in real size (I find perspective hard when viewing cards online) and handling all the extras - felt, paper, ribbon and twine.

The purpose of this trip was to take two, two hour Copic classes from Wendy Ramlakhan. You can see her work at http://sugarpea-designs.blogspot.com/. The first technique class covered basic blending, basic faces (and knees) and hair, creating texture with colorless blending solution, and coloring white. After a short lunch break at Olivia's next door we covered more complex hair and skin, feathering, coloring black, creating pleats and coloring metallics like copper. Wendy is very organized and the class flowed nicely, even with a large class of 20.

I think I can see another road trip for the cult in the future.